Using Spring Authorization Server as an Auth Solution on Koyeb
Introduction
OAuth 2.0 is an industry-standard protocol for authorization for applications and services. However, running and customizing your own identity provider, like Keycloak, can be a challenge, especially for smaller organizations. The Spring Authorization Server is a secure, lightweight, and customizable alternative to build your own identity provider.
In this guide, we'll walk through how to create an application with identity and authorization provided by Spring Authorization Server. We will use start.spring.io to generate application templates to create a secure production environment in a matter of minutes instead of hours!
You can deploy and preview the applications from this guide by clicking the Deploy to Koyeb buttons below. You must set the appropriate environment variable values during the deployment configuration. View the application repository for more information on how to set the correct values.
To deploy the server, use the following button:

Afterwards, to deploy the client, click this button:
Requirements
To successfully follow this tutorial, you will need the following:
- Java 17 or newer installed on your local machine
- A GitHub account to host your code and deploy your application using the Koyeb's git-driven deployment method
- A Koyeb account to build, deploy and run the application
Steps
To complete this tutorial and deploy a Spring Boot application with a configured Spring Authorization Server on Koyeb, you need to follow these steps:
- From start.spring.io to Production in 5 minutes
- Set up the Spring Authorization Server
- Save user credentials in PostgreSQL
- Create a user management API
From start.spring.io to production in 5 minutes
First create a new directory on your local computer to hold the project files:
mkdir auth-koyeb
Next, head over to start.spring.io to create a new Spring Boot project. The above link preselects all of the options we want, namely:
- Maven as the build tool and project manager
- Java as the language
- 3.2.1 as the Spring Boot version
- The following project metadata:
- Group: (default:
com.koyeb): can be anything you want - Artifact:
auth-client - Name:
auth-client - Description: can be anything you want
- Package name:
com.koyeb.auth-client - Packaging: Jar
- Java version: 17
- Group: (default:
- The following dependency:
- Spring Web
Click on Generate to download the project files. Download the .zip file to the new project directory you created above.
Extract the project files from the zip archive and delete the zip:
unzip auth-client.zip
rm auth-client.zip
Your project directory should now have the following structure:
auth-koyeb         ## Project root directory
└── auth-client    ## Client application root
    ├── HELP.md    ## Generated help information
    ├── mvnw       ## A wrapper for Maven for Linux and *nix systems
    ├── mvnw.cmd   ## A wrapper for Maven for Windows systems
    ├── pom.xml    ## Maven project definitions
    └── src        ## Source code
        ├── main
        │   ├── java        ## Java code
        │   │   └── com
        │   │       └── koyeb
        │   │           └── authclient
        │   │               └── AuthClientApplication.java
        │   └── resources   ## Project properties and assets
        │       ├── application.properties
        │       ├── static
        │       └── templates
        └── test   ## Generated tests
            └── java
                └── com
                    └── koyeb
                        └── authclient
                            └── AuthClientApplicationTests.java
Now that we have a set of project files, we can get started with a basic application.
Koyeb makes your Java apps swing globally in minutes
Create a hello world application
To get started, we'll first create a HelloController.java file in the auth-koyeb/auth-client/src/main/java/com/koyeb/authclient/ directory. Open the file in your editor and paste the following contents:
// auth-koyeb/auth-client/src/main/java/com/koyeb/authclient/HelloController.java
package com.koyeb.authclient;

import org.springframework.stereotype.Controller;
import org.springframework.web.bind.annotation.GetMapping;
import org.springframework.web.bind.annotation.ResponseBody;

@Controller
public class HelloController {
  @GetMapping("/")
  @ResponseBody
  String hello() {
    return "Hello World";
  }

}
After the initial package and import declarations, we define a new HelloController class. The @GetMapping("/") annotation indicates that this class should respond to requests sent to the root path of your application. The body will contain "Hello World".
To test this out, start the Spring Boot application using the Maven wrapper in the /auth-koyeb/auth-client directory. You must be in the same directory as the script for it to execute correctly:
cd ./auth-koyeb/auth-client
./mvnw spring-boot:run
After building the project, the Spring Boot application will be available at http://localhost:8080. If you visit with your browser, you should see the "Hello World" message we crafted.
Press CTRL-C to stop the application when you are finished.
Prepare the Koyeb deployment
Next, create a system.properties file in the auth-koyeb/auth-client directory. Inside, set the version of Java to 17:
# auth-koyeb/auth-client/system.properties
java.runtime.version=17
Koyeb's Java builder will consult this to determine which version of Java to use during building and deployment.
If you haven't done so already, create a new repository for your project on GitHub. Now we can initialize a new Git repository for the project, commit our changes, and push them to the new GitHub repo:
Note: Be sure to initialize the repository in the auth-koyeb directory instead of the auth-koyeb/auth-client directory. We will use a single repository for the server and client applications.
cd auth-koyeb
git init
git add :/
git commit -m "Initial commit"
git remote add origin git@github.com:<YOUR_GITHUB_USERNAME>/<YOUR_REPOSITORY_NAME>.git
git branch -M main
git push -u origin main
Your project files should now be synced up to GitHub, ready to deploy.
Deploy to Koyeb
To deploy your new application, open the Koyeb control panel and complete the following steps:
- On the Overview tab, click Create Web Service to begin configuration.
- Select GitHub as the deployment method.
- Select your project from the GitHub repository list.
- Change the name of your service to
auth-client. - In the Builder section, select Buildpack. Click the Override toggle associated with the Work directory option and enter
auth-clientin the field. - Change the App and Service name to
auth-client. This determines where the application will be deployed to. For example,https://auth-client-YOUR_USERNAME.koyeb.app. - Click Deploy to begin the deployment process.
Your project will be cloned from GitHub, built, and deployed. You will be redirected to the deployment screen where you can track its progress and find the public URL of your application:
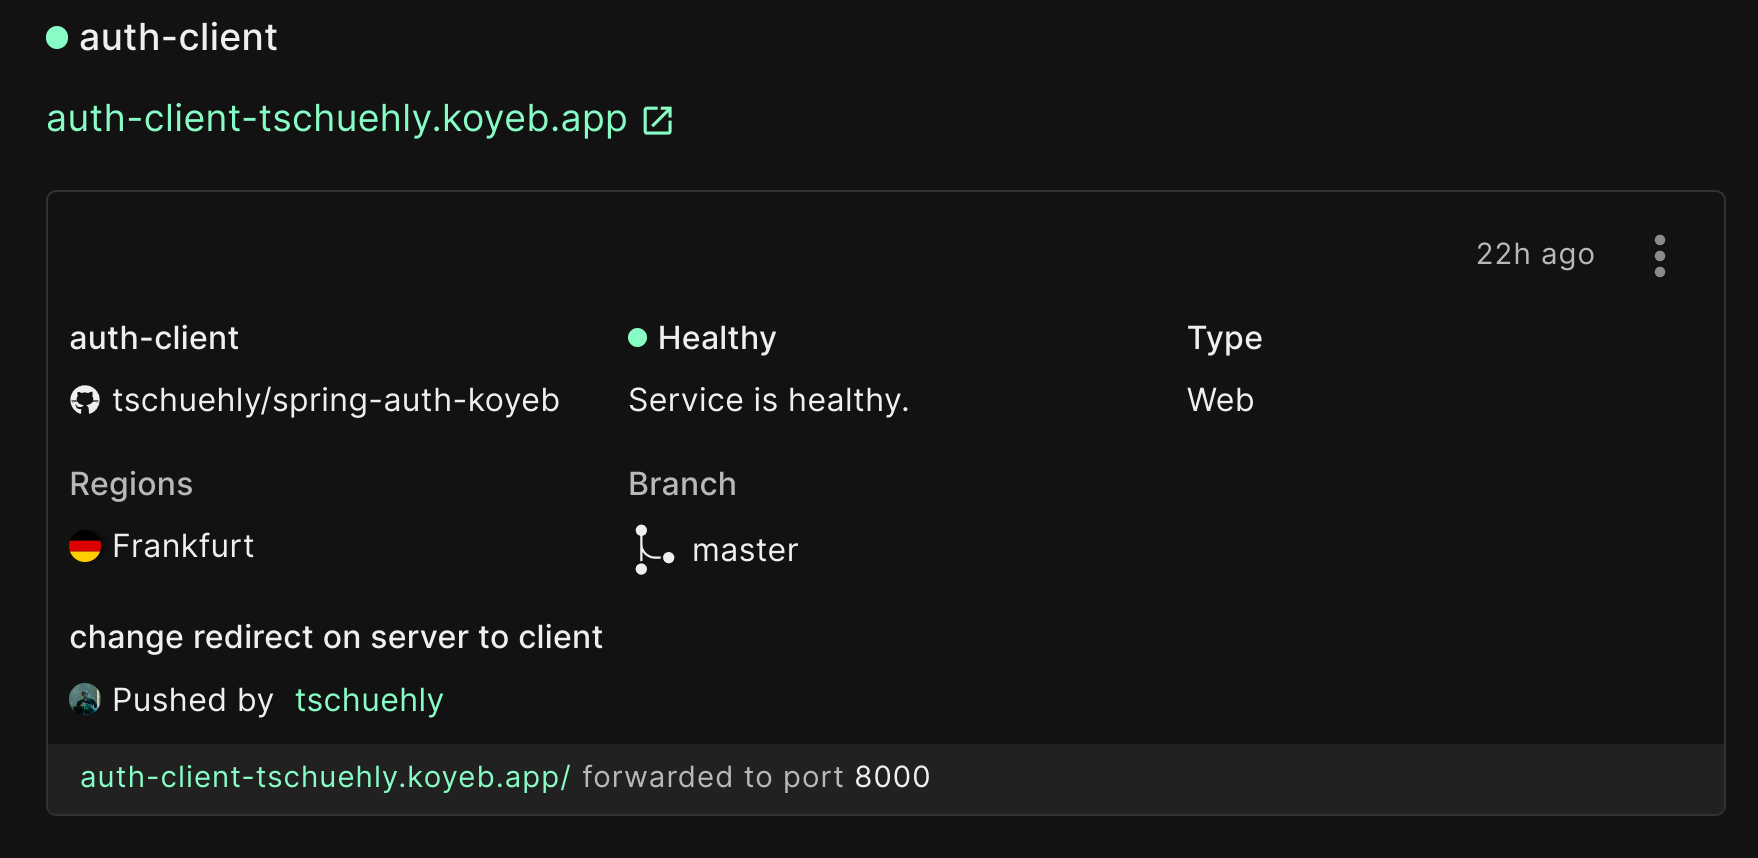
Checkpoint 1
Once the project is deployed, if you visit the public URL of your application, you should see a "Hello World" in your browser!
Set up the Spring Authorization Server
In this section, we will create a minimal Spring Authorization Server that uses an in-memory database. We will push it to Koyeb and then update the auth-client application to use the authorization server as identity provider.
To create a new Spring Authorization Server, go to start.spring.io again. This time we will use the following options:
- Maven as the build tool and project manager
- Java as the language
- 3.2.1 as the Spring Boot version
- The following project metadata:
- Group: (default:
com.koyeb): can be anything you want - Artifact:
auth-server - Name:
auth-server - Description: can be anything you want
- Package name:
com.koyeb.auth-client - Packaging: Jar
- Java version: 17
- Group: (default:
- The following dependencies:
- PostgreSQL Driver
- OAuth2 Authorization Server
- JDBC API
Click on Generate to download the project. Select your project directory (auth-koyeb) as the download destination.
Again, unzip the project files, creating a new directory structure beside the existing auth-client directory, and then delete the zip file:
unzip auth-server.zip
rm auth-server.zip
Configure authentication in the authorization server
Now that the auth-server files are available, we can create a UserDetailsService in the AuthServerApplication.java file. We will exclude the DataSourceAutoConfiguration.class so that Spring Boot doesn't try to autoconfigure a database.
Open the AuthServerApplication.java file in the auth-koyeb/auth-server/src/main/java/com/koyeb/authserver/ directory and replace the contents with the following:
// auth-koyeb/auth-server/src/main/java/com/koyeb/authserver/AuthServerApplication.java
package com.koyeb.authserver;

import org.springframework.boot.SpringApplication;
import org.springframework.boot.autoconfigure.SpringBootApplication;
import org.springframework.boot.autoconfigure.jdbc.DataSourceAutoConfiguration;
import org.springframework.context.annotation.Bean;
import org.springframework.security.core.userdetails.User;
import org.springframework.security.core.userdetails.UserDetailsService;
import org.springframework.security.provisioning.InMemoryUserDetailsManager;

@SpringBootApplication(exclude = {DataSourceAutoConfiguration.class})
public class AuthServerApplication {

  public static void main(String[] args) {
    SpringApplication.run(AuthServerApplication.class, args);
  }

  @Bean
  UserDetailsService inMemoryUserDetailsManager() {
    return new InMemoryUserDetailsManager(
        User.builder()
            .username("user")
            // "secret" is the password
            .password("{bcrypt}$2a$13$gDRvJKxJ1N6Kn83Lx46Btu3CCfYEbYuF8oXu62jwzuKwfkENHwh/S")
            .roles("USER")
            .build()
    );
  }
}
This addition to the AuthServerApplication class creates a new InMemoryUserDetailsManager that is responsible for responding to authentication requests. We use the InMemoryUserDetailsManager with a single user configured:
- Username:
user - Password:
secret
The password is encrypted with bcrypt and the user is given the USER role.
A small detour: what are authentication and authorization?
Before we continue, let's take a moment to clarify the difference between authentication and authorization.
In simple terms, authentication is the process of verifying who a user is. After a user's identity is established, authorization defines what they have access to.
In our example, the user can prove who they are by providing the credentials (Username: user, password: secret) thereby authenticating themselves. The user can then access all resources granted to the USER role.
As we are using the Spring Authorization Server, we need to implement the authentication part ourselves. Spring makes this easy by letting us define a UserDetailsService bean as we did above.
Test the authentication
To test the authorization, move into the auth-koyeb/auth-server directory and run the application with Maven wrapper:
cd ./auth-koyeb/auth-server
./mvnw spring-boot:run
If you visit http://localhost:8080 in your browser, you should see a login screen. Log in with the username: user and the password: secret.
Note: Because we not yet configured the post-authentication redirect to something more appropriate, you will be redirected to a WhiteLabel error page. This is expected and it indicates that the authentication was successful.
Press CTRL-C to stop the application when you are finished.
Integrate the auth-client and the auth-server
Now we have both of the core components required for our application, the client application and the authorization server. The next step is to connect them.
Configure the auth-server
In the auth-koyeb/auth-server/src/main/resources directory, rename the application.properties file to application.yaml to use YAML markup. Inside, paste the following application details:
# auth-koyeb/auth-server/src/main/resources/application.yaml
server.port: 8099
spring:
  security.oauth2.authorizationserver.client:
    koyeb-client:
      require-authorization-consent: false
      registration:
        client-authentication-methods: 'client_secret_basic'
        client-id: auth-client
        client-secret: '{bcrypt}$2a$10$jdJGhzsiIqYFpjJiYWMl/eKDOd8vdyQis2aynmFN0dgJ53XvpzzwC'
        redirect-uris:
          - 'http://127.0.0.1:8080/login/oauth2/code/spring'
        authorization-grant-types: 'authorization_code'
        scopes: 'user.read,user.write,openid'
server.forward-headers-strategy: framework
This configures the authorization server to listen on port 8099 and registers a new OAuth2 client with the expected details of our client application.
In more detail:
koyeb-client: defines a new OAuth2 client configuration.require-authorization-consent: false: disables the need to consent to authorization after login.registration: defines a newRegisteredClient.client-authentication-methods: "client_secret_basic": tells theauth-serverthat this client can authorize itself with basic authentication.client-id: "auth-client"andclient-secret: "{bcrypt}....": define the credentials that theauth-clientapplication needs to submit when starting an authorization flow.redirect-uris: defines the URLs that theauth-servermay redirect to after successfully authenticating the user.authorization-grant-types: authorization_code: specifies that theauth-clientneeds to redirect the user to the authorization server to authenticate themselves. After user authentication, the authorization server redirects back to theauth-clientapplication with an authorization code.scopes: can limit the scope of user information the client can request from theauth-server.server.forward-headers-strategy: configures correct header forwarding when deploying behind a reverse-proxy that handles the domain name.
Configure the auth-client
Next, we'll configure the auth-client to use the authorization server. Add the following dependency to the auth-koyeb/auth-client/pom.xml file between the <dependencies> tags:
<!-- auth-koyeb/auth-client/pom.xml -->
. . .
  <dependencies>
    . . .
    <!-- Add the following dependency -->
    <dependency>
      <groupId>org.springframework.boot</groupId>
      <artifactId>spring-boot-starter-oauth2-client</artifactId>
    </dependency>
    <!-- End of new dependency -->
    . . .
  </dependencies>
. . .
Afterwards, rename the application.properties file to application.yaml in the auth-koyeb/auth-client/src/main/resources directory to use YAML markup. Inside, paste the following application details:
# auth-koyeb/auth-client/src/main/resources/application.yaml
spring:
  security.oauth2.client:
    provider:
      spring:
        issuer-uri: http://localhost:8099
    registration:
      spring:
        authorization-grant-type: authorization_code
        client-authentication-method: client_secret_basic
        client-id: auth-client
        client-secret: secret
        provider: spring
        redirect-uri: '{baseUrl}/login/oauth2/code/{registrationId}'
        scope: user.read,openid
server.forward-headers-strategy: framework
This configures the values that the auth-client will supply when authenticating a user.
Test the integration
Now, we can test the integration between our two components.
First, move back into the auth-koyeb/auth-server directory and restart the authentication server:
cd auth-koyeb/auth-server
./mvnw spring-boot:run
Now, in a second terminal window, go to the auth-koyeb/auth-client directory and start the client application as well:
cd auth-koyeb/auth-client
./mvnw spring-boot:run
Checkpoint 2
With both applications running, visit the client application at http://127.0.0.1:8080.
Note: It is important that you use 127.0.0.1 instead of localhost so that the cookies for the two applications don't interfere with one another.
You should be redirected to http://localhost:8099/login. Sign in with username: user and password: secret.
You should be authenticated as expected and redirected back to http://127.0.0.1:8080 where you can see the "Hello World" greeting!
Press CTRL-C in both terminal windows when you are finished to stop the applications.
Prepare the Koyeb deployment
Before deploying the application to Koyeb, we need to create a system.properties file for the auth-server application. Create a new file in auth-koyeb/auth-server called system.properties and paste the following inside:
Deploy close to your users on high-performance infrastructure
# auth-koyeb/auth-server/system.properties
java.runtime.version=17
Deploy the Spring Authorization Server to Koyeb
Add the new changes to the Git repository and push them to GitHub:
git add :/
git commit -m "Add auth-server"
git push
Note: When you push the new changes to the repository, the changes to your client application will automatically be deployed to Koyeb. Because we haven't completed the configuration, you should expect this new deployment to fail. We will update the client component to make it work correctly momentarily.
Once the changes are in your repository, open the Koyeb control panel and complete the following steps to deploy the authorization server:
- On the Overview tab, click Create Web Service to begin configuration.
- Select GitHub as the deployment method.
- Select your project from the GitHub repository list.
- In the Builder section, select Buildpack. Click the Override toggle associated with the Work directory option and enter
auth-serverin the field. - Change the App and Service name to
auth-server. This determines where the application will be deployed to. For example,https://auth-server-YOUR_USERNAME.koyeb.app. - Click Deploy to begin the deployment process.
Your project will be cloned from GitHub, built, and deployed. You will be redirected to the deployment screen where you can track its progress and find the public URL of your application.
If you visit the server application's URL, you should see the login screen and be able to log in with the user: user and the password: secret. This will redirect you to the same WhiteLabel error page from earlier.
This is not the behavior we want. For this to work, we need to update the application.yaml files for both the auth-server and auth-client applications to use our Koyeb domains.
Update the application.yaml files
First, update the application.yaml file in the auth-koyeb/auth-client/src/main/resources/ directory. We need to change the issuer-uri value from http://localhost:8099 to the domain name where the authorization server is hosted. You can find this on the authorization server's page in Koyeb.
Assuming that you called the service auth-server during creation, it should have the following format:
https://auth-server-<YOUR_KOYEB_ORG>.koyeb.app
The updated portion of the file will look like this:
# auth-koyeb/auth-client/src/main/resources/application.yaml
spring:
  security.oauth2.client:
    provider:
      spring:
        # issuer-uri: http://localhost:8099
        issuer-uri: https://auth-server-<YOUR_KOYEB_ORG>.koyeb.app
. . .
Next, open the application.yaml file in the auth-koyeb/auth-server/src/main/resources/ directory.
Here, the part we need to update is the redirect-uris list. Copy the current value and replace the http://127.0.0.1:8080 portion of the URL with the auth-client URL from Koyeb. You can find this on the client's page in Koyeb.
Assuming that you called the service auth-client during creation, the client's URL in Koyeb should have the following format:
https://auth-client-<YOUR_KOYEB_ORG>.koyeb.app
With the /login/oauth2/code/spring path, the complete URL you need to add will look like this:
https://auth-client-<YOUR_KOYEB_ORG>.koyeb.app/login/oauth2/code/spring
The updated portion of the file will look like this:
# auth-koyeb/auth-server/src/main/resources/application.yaml
. . .
spring:
  security.oauth2.authorizationserver.client:
    koyeb-client:
      . . .
      registration:
        . . .
        redirect-uris:
          - "http://127.0.0.1:8080/login/oauth2/code/spring"
          - "https://auth-client-<YOUR_KOYEB_ORG>.koyeb.app/login/oauth2/code/spring"
. . .
Commit the files to the repository and push them to GitHub:
git add :/
git commit -m "Adjust authorization URLs"
git push
When you push the changes to GitHub both of your applications will be automatically deployed with the updated code.
Checkpoint 3
If you now visit the URL for your client application again (https://auth-client-<YOUR_KOYEB_ORG>.koyeb.app), you should be once again redirected to https://auth-server-<YOUR_KOYEB_ORG>.koyeb.app.
Log in with username: user and password: secret and you should be correctly redirected back to https://auth-client-<YOUR_KOYEB_ORG>.koyeb.app where the "Hello World" greeting is served.
Save the user credentials in PostgreSQL
Next, we will configure the Spring Authorization Server to use a PostgreSQL database running on Koyeb to store our user credentials and enable registration.
Set up the schema
First, create a schema.sql file in the auth-koyeb/auth-esrver/src/main/resources/ directory that configures the necessary schema for the Authorization Server:
-- auth-koyeb/auth-server/src/main/resources/schema.sql

-- users
create table if not exists users
(
    username varchar(200) not null primary key,
    password varchar(500) not null,
    enabled  boolean      not null
);
-- authorities
create table if not exists authorities
(
    username  varchar(200) not null,
    authority varchar(50)  not null,
    constraint fk_authorities_users foreign key (username) references users (username),
    constraint username_authority UNIQUE (username, authority)
);
create unique index if not exists  ix_auth_username on authorities (username,authority);

-- groups
create table if not exists  groups (
	id bigint generated by default as identity(start with 1) primary key,
	group_name varchar(50) not null
);

create table if not exists  group_authorities (
	group_id bigint not null,
	authority varchar(50) not null,
	constraint fk_group_authorities_group foreign key(group_id) references groups(id)
);

create table if not exists  group_members (
	id bigint generated by default as identity(start with 1) primary key,
	username varchar(50) not null,
	group_id bigint not null,
	constraint fk_group_members_group foreign key(group_id) references groups(id)
);
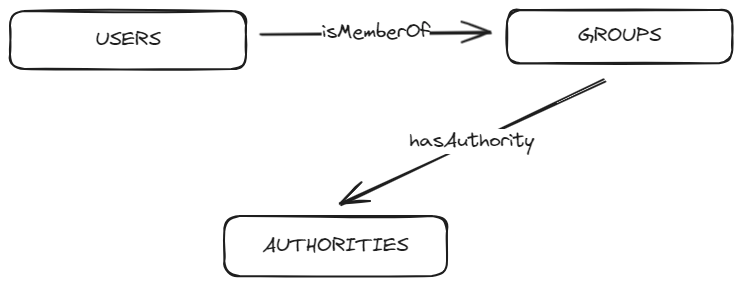
This creates the following tables:
usersauthoritiesgroupsgroup_authoritiesgroup_members
It also creates an index on the authorities table for faster lookups.
The schema has the following structure:
Create a JdbcUserDetailsManager
Next, we'll rework the server application so that it uses a PostgreSQL database as its data source instead of the in-memory database.
Replace the contents of the AuthServerApplication.java file in the auth-koyeb/auth-server/src/main/java/com/koyeb/authserver/ directory with the following:
// auth-koyeb/auth-server/src/main/java/com/koyeb/authserver/AuthServerApplication.java
package com.koyeb.authserver;

import javax.sql.DataSource;
import org.springframework.boot.ApplicationRunner;
import org.springframework.boot.SpringApplication;
import org.springframework.boot.autoconfigure.SpringBootApplication;
import org.springframework.context.annotation.Bean;
import org.springframework.security.core.userdetails.User;
import org.springframework.security.provisioning.JdbcUserDetailsManager;
import org.springframework.security.provisioning.UserDetailsManager;

@SpringBootApplication
public class AuthServerApplication {

  public static void main(String[] args) {
    SpringApplication.run(AuthServerApplication.class, args);
  }

  @Bean
  UserDetailsManager jdbc(DataSource dataSource) {
    return new JdbcUserDetailsManager(dataSource);
  }

  @Bean
  public ApplicationRunner initializeUsers(UserDetailsManager userDetailsManager) {
    return (args) -> {
      if (!userDetailsManager.userExists("user")) {
        userDetailsManager.createUser(
            User.builder()
                .roles("USER")
                .username("user")
                .password("{bcrypt}$2a$10$jdJGhzsiIqYFpjJiYWMl/eKDOd8vdyQis2aynmFN0dgJ53XvpzzwC")
                .build()
        );
      }
    };
  }
}
The new code does the following:
- Removes the
DataSourceAutoConfiguration.classexclusion since we want Spring to set up aDataSourcebean for us now. - Create a
JdbcUserDetailsManagerbean that allows you to manage users and groups that are saved in our database via the JDBC API. - Uses an
ApplicationRunnerbean to create the same user as we did before with theuser:secretcredentials, if the user does not already exist in the database.
Set up a managed PostgreSQL database on Koyeb
Next, we can provision a PostgreSQL database on Koyeb. In the control panel, go to the Database Services page and click Create Database Service. Choose a descriptive name and your preferred region. You can leave the rest of the settings as they are.
Once you create the database, you will be redirected to the connection details page. Click the "Java" to change the view and then click the copy icon on the right.
Open the auth-koyeb/auth-server/src/main/resources/application.yaml file in your text editor and add the sql and datasource sections under the spring key. Don't remove any of the existing configuration.
Paste the connection URL you copied from the Koyeb control panel as the data source URL, removing the JDBC_URI= prefix and query parameters after the ? (?user=...):
# auth-koyeb/auth-server/src/main/resources/application.yaml
. . .
spring:
  sql:
    init:
      mode: always
  datasource:
    url: "jdbc:postgresql://<YOUR_KOYEB_DB_URL>/koyebdb"
    username: koyeb-adm
    password: ${DATABASE_PASSWORD}
  . . .
This sets the SQL init mode to always so that the schema.sql we created is executed on startup. The datasource configuration supplies the connection information for the database.
Note: You should never commit production credentials to GitHub. You should use an environment variable as we are doing here.
Deploy to Koyeb
Before we deploy the new code to Koyeb, we should configure an environment variable with our database password.
Visit your auth-server application in the Koyeb control panel. Click on the Settings tab for the auth-server service. Towards, the bottom of the page, click to expand the Advanced section.
Click Add Variable in the Environment variables and files section to add a new environment variable. Name it DATABASE_PASSWORD to match the value we used in the application.yaml file above. Set the type to Secret and set value to the password for your database, copied from the database details page. Click Apply when you are finished to save the new configuration.
Next, commit your changes the Git repository and push it to GitHub:
git add :/
git commit -m "Add database configuration details"
git push
The new version will be deployed automatically. You can check the progress of the deployment in control panel.
Create a user management API
Now that our Authentication and Authorization flow works and can be persisted with a database, we can add the ability to manage users.
We will create a simple API to manage users directly from the browser by using a subset of methods available in the JdbcUserDetailsManager class.
Open the AuthServerApplication.java file in the auth-koyeb/auth-server/src/main/java/com/koyeb/authserver/ directory again. First, we'll go over the individual changes in detail. Afterwards, we'll provide the complete content that you can paste into your file (including necessary import lines that we won't be covering explicitly).
Begin by adding the @EnableMethodSecurity Authorization annotations to the AuthServerApplication class to allow us to preauthorize on the method and controller level (like @PreAuthorize("hasRole('ADMIN')")).
// auth-server/src/main/java/com/koyeb/authserver/AuthServerApplication.java
@SpringBootApplication
@EnableMethodSecurity
public class AuthServerApplication
Next, adjust the JdbcUserDetailsManager implementation. We want to call the following methods:
setEnableAuthorities(false): disables loading authorities (roles) from the authorities table on the user object level.setEnableGroups(true): enables support for loading group authorities.
To do this, we need to change the UserDetailsManager block to the following:
@Bean
JdbcUserDetailsManager jdbc(DataSource dataSource) {
  JdbcUserDetailsManager jdbc = new JdbcUserDetailsManager(dataSource);
  jdbc.setEnableAuthorities(false);
  jdbc.setEnableGroups(true);
  return jdbc;
}
Next, create a PasswordEncoder that will be used to hash the passwords. The default is BCryptPasswordEncoder
@Bean
PasswordEncoder passwordEncoder() {
  return PasswordEncoderFactories.createDelegatingPasswordEncoder();
}
Finally, adjust the initializeUsers method to do the following:
- rename the initial user to
admin - remove the
roles("USER")method call in theUserBuilder - create the groups:
GROUP_USERandGROUP_ADMIN - add the
adminuser to both groups
The initializeUsers method will look like this with these changes:
@Bean
public ApplicationRunner initializeUsers(JdbcUserDetailsManager userDetailsManager) {
  return (args) -> {
    String userName = "admin";
    if(!userDetailsManager.userExists(userName)){
      userDetailsManager.createUser(
          User.builder()
              .username(userName)
              .password("{bcrypt}$2a$10$jdJGhzsiIqYFpjJiYWMl/eKDOd8vdyQis2aynmFN0dgJ53XvpzzwC")
              .build()
      );
      userDetailsManager.createGroup("GROUP_USERS", AuthorityUtils.createAuthorityList("ROLE_USER"));
      userDetailsManager.addUserToGroup(userName, "GROUP_USER");
      userDetailsManager.createGroup("GROUP_ADMINS", AuthorityUtils.createAuthorityList("ROLE_ADMIN"));
      userDetailsManager.addUserToGroup(userName, "GROUP_ADMINS");
    }
  };
}
To implement all of the above changes, paste the following contents into the AuthServerApplication.java file:
// auth-koyeb/auth-server/src/main/java/com/koyeb/authserver/AuthServerApplication.java
package com.koyeb.authserver;

import javax.sql.DataSource;
import org.springframework.boot.ApplicationRunner;
import org.springframework.boot.SpringApplication;
import org.springframework.boot.autoconfigure.SpringBootApplication;
import org.springframework.context.annotation.Bean;
import org.springframework.security.config.annotation.method.configuration.EnableMethodSecurity;
import org.springframework.security.core.authority.AuthorityUtils;
import org.springframework.security.core.userdetails.User;
import org.springframework.security.crypto.factory.PasswordEncoderFactories;
import org.springframework.security.crypto.password.PasswordEncoder;
import org.springframework.security.provisioning.JdbcUserDetailsManager;

@SpringBootApplication
@EnableMethodSecurity
public class AuthServerApplication {

  public static void main(String[] args) {
    SpringApplication.run(AuthServerApplication.class, args);
  }

  @Bean
  JdbcUserDetailsManager jdbc(DataSource dataSource) {
    JdbcUserDetailsManager jdbc = new JdbcUserDetailsManager(dataSource);
    jdbc.setEnableAuthorities(false);
    jdbc.setEnableGroups(true);
    return jdbc;
  }

  @Bean
  PasswordEncoder passwordEncoder() {
    return PasswordEncoderFactories.createDelegatingPasswordEncoder();
  }

  @Bean
  public ApplicationRunner initializeUsers(JdbcUserDetailsManager userDetailsManager) {
    return (args) -> {
      String userName = "admin";
      if (!userDetailsManager.userExists(userName)) {
        userDetailsManager.createUser(
            User.builder()
                .username(userName)
                .password("{bcrypt}$2a$10$jdJGhzsiIqYFpjJiYWMl/eKDOd8vdyQis2aynmFN0dgJ53XvpzzwC")
                .build()
        );
        userDetailsManager.createGroup("GROUP_USERS", AuthorityUtils.createAuthorityList("ROLE_USER"));
        userDetailsManager.addUserToGroup(userName, "GROUP_USERS");
        userDetailsManager.createGroup("GROUP_ADMINS", AuthorityUtils.createAuthorityList("ROLE_ADMIN"));
        userDetailsManager.addUserToGroup(userName, "GROUP_ADMINS");
      }
    };
  }
}
Implement the user management API
Next, we'll add the API endpoints to manage users to a new file called UserManagementController.java in the auth-koyeb/auth-server/src/main/java/com/koyeb/authserver/ directory.
Start the file off with the following content:
// auth-koyeb/auth-server/src/main/java/com/koyeb/authserver/UserManagementController.java
package com.koyeb.authserver;

import java.util.List;
import org.springframework.security.access.prepost.PreAuthorize;
import org.springframework.security.core.GrantedAuthority;
import org.springframework.security.core.authority.AuthorityUtils;
import org.springframework.security.core.userdetails.User;
import org.springframework.security.core.userdetails.UserDetails;
import org.springframework.security.crypto.password.PasswordEncoder;
import org.springframework.security.provisioning.JdbcUserDetailsManager;
import org.springframework.web.bind.annotation.GetMapping;
import org.springframework.web.bind.annotation.PathVariable;
import org.springframework.web.bind.annotation.RestController;

@PreAuthorize("hasRole('ADMIN')")
@RestController
public class UserManagementController {

  private final JdbcUserDetailsManager userDetailsManager;
  private final PasswordEncoder passwordEncoder;

  public UserManagementController(JdbcUserDetailsManager userDetailsManager, PasswordEncoder passwordEncoder) {
    this.userDetailsManager = userDetailsManager;
    this.passwordEncoder = passwordEncoder;
  }

}
Koyeb offers native support of popular languages and anything with a Dockerfile
The parts to note are the following:
@PreAuthorize("hasRole('ADMIN')"): this will limit the ability to execute these methods to users that have theROLE_ADMINauthority.@RestController: this creates a Spring controller bean that puts the response data in the response body.
Next, add the methods that expose the most important JdbcUserDetailsManager functions for retrieving user and group data from the database. Put these towards the bottom of the UserManagementController class:
// auth-koyeb/auth-server/src/main/java/com/koyeb/authserver/UserManagementController.java
. . .
  @GetMapping("/users/{userName}")
  UserDetails loadUser(@PathVariable String userName) {
    return userDetailsManager.loadUserByUsername(userName);
  }

  @GetMapping("/groups")
  List<String> getAllGroups() {
    return userDetailsManager.findAllGroups();
  }
  @GetMapping("/groups/{groupName}/users")
  List<String> getUsersInGroup(@PathVariable String groupName) {
    return userDetailsManager.findUsersInGroup("GROUP_" + groupName);
  }

  @GetMapping("/groups/{groupName}/authorities")
  List<GrantedAuthority> getGroupAuthorities(@PathVariable String groupName) {
    return userDetailsManager.findGroupAuthorities("GROUP_" +groupName);
  }
. . .
To start the AuthServerApplication locally and test the changes, you can execute the following. Because the project is now configured with a database, we need to provide our database password with the DATABASE_PASSWORD environment variable, just like our Koyeb deployment does:
cd auth-koyeb/auth-server
DATABASE_PASSWORD="<YOUR_KOYEB_DB_PASSWORD>" ./mvnw spring-boot:run
Now, go to http://localhost:8099 in your browser and log in with username: admin and password: secret.
While you'll be taken to a WhiteLabel error page upon authentication, if you now go to http://localhost:8099/users/admin you should get the details of the admin user. When pretty printed for readability, the JSON response should look something like this:
{
  "password": "{bcrypt}$2a$10$jdJGhzsiIqYFpjJiYWMl/eKDOd8vdyQis2aynmFN0dgJ53XvpzzwC",
  "username": "admin",
  "authorities": [
    {
      "authority": "ROLE_ADMIN"
    },
    {
      "authority": "ROLE_USER"
    }
  ],
  "accountNonExpired": true,
  "accountNonLocked": true,
  "credentialsNonExpired": true,
  "enabled": true
}
Next, visit http://localhost:8099/groups to see all of the available groups:
["GROUP_USERS", "GROUP_ADMINS"]
If you go to http://localhost:8099/groups/USERS/users, you can see all of users that are a member of the GROUP_USERS group:
["admin"]
Visiting http://localhost:8099/groups/USERS/authorities will give you all of the authorities that are assigned to the USERS group:
[
  {
    "authority": "ROLE_USER"
  }
]
Press CTRL-C to stop the application when you are finished.
Create and update users and groups
Next, we will add methods to create a user, create a group, and add a user to a group.
Open up the UserManagementController.java file in the auth-koyeb/auth-server/src/main/java/com/koyeb/authserver/ directory again. Add the following methods to the UserManagementController class to enable this functionality:
// auth-koyeb/auth-server/src/main/java/com/koyeb/authserver/UserManagementController.java
. . .
  @GetMapping("/users/create/{userName}:{password}")
  UserDetails createUser(
    @PathVariable String userName,
    @PathVariable String password
  ) {
    userDetailsManager.createUser(
      User.builder()
        .username(userName)
        .password(passwordEncoder.encode(password))
        .build()
    );
    addUserToGroup("USERS", userName);
    return loadUser(userName);
  }

  @GetMapping("/groups/create/{groupName}:{role}")
  List<GrantedAuthority> createGroup(@PathVariable String groupName, @PathVariable String role) {
    userDetailsManager.createGroup(
      "GROUP_" + groupName,
      AuthorityUtils.createAuthorityList("ROLE_" + role)
    );
    return userDetailsManager.findGroupAuthorities("GROUP_" + groupName);
  }

  @GetMapping("/groups/{groupName}/add/{userName}")
  List<String> addUserToGroup(
    @PathVariable String groupName,
    @PathVariable String userName
  ) {
    userDetailsManager.addUserToGroup(userName, "GROUP_" + groupName);
    return getUsersInGroup(groupName);
  }
. . .
Basically, these methods do the following:
createUser: uses the sameUserBuilderasinitializeUsersin theApplicationRunner:- It sets the password to a hashed value using
passwordEncoder.encode(password). - Then adds the user to the
GROUP_USERgroup. - Finally, it returns the
UserDetailsobject by calling theloadUser(userName)method.
- It sets the password to a hashed value using
createGroup: creates a group with theROLE_{role}authority and then returns the list of authorities that the group has.addUserToGroup: adds the{userName}user to the{groupName}group and returns all users currently in that group.
Start up the server again using the same command as last time:
cd auth-koyeb/auth-server
DATABASE_PASSWORD="<YOUR_KOYEB_DB_PASSWORD>" ./mvnw spring-boot:run
Now, if you go to http://localhost:8099/users/create/peter:parker, a new user will be created with the username: peter and password: parker. You will be given their user details:
{
  "password": "{bcrypt}$2a$10$OWvgr/CwLivK/xnvx8ooouI94keA0M8oNBQJSug9a.4L9.OFUhK3.",
  "username": "peter",
  "authorities": [
    {
      "authority": "ROLE_USER"
    }
  ],
  "accountNonExpired": true,
  "accountNonLocked": true,
  "credentialsNonExpired": true,
  "enabled": true
}
Next, create a new group by visiting http://localhost:8099/groups/create/AVENGERS:AVENGER. This creates a new group called GROUP_AVENGERS with the ROLE_AVENGER authority:
[
  {
    "authority": "ROLE_AVENGER"
  }
]
You can then add peter to the AVENGERS group by going to http://localhost:8099/groups/AVENGERS/add/peter:
["peter"]
Press CTRL-C to stop the application when you are finished.
Our user management is working as expected locally. We can deploy this additional functionality to Koyeb by committing the changes and pushing them to GitHub:
git add :/
git commit -m "Add user management API"
git push
Once deployed, the same user management features will be available in the deployed version of your applications.
Conclusion
In this tutorial, we've demonstrated how to deploy Spring Boot applications using to Koyeb from a GitHub repository with continuous delivery.
We developed both a client and server application to walk through the authentication and authorization flows available. We then configured the Spring Authorization Server to use a Koyeb managed PostgreSQL database as the persistence layer. Afterwards, we showed how to authorize and manage users with JdbcUserDetailsManager, creating a foundation that you can use to build your own identity provider.
If you want to continue to learn about the Spring Authorization Server, some good resources include Enterprise Security with Spring Authorization Server 1.0 by Rob Winch @ Spring I/O and the Spring Authorization Server Reference. If you have any questions or suggestions regarding this guide, feel free to reach out to us on Slack, or to the author on Twitter: twitter.com/tschuehly.
Check out our Java documentation and Java one-click app to learn more about deploying Java applications on Koyeb.

