Use Stable Diffusion and PyTorch to Build an Image Inpainting Service
One standout feature of Firefly models from Adobe is generative fill: simply outline the area you want to modify, provide a prompt, and the model generates the content for you.
Generative fill is possible due to image inpainting, which restores missing or damaged parts of an image by using information from surrounding pixels. Common use cases range from personal photo editing to professional image restoration in various industries.
Stable Diffusion is an open source generative AI model that creates unique photorealistic images from text and image prompts. In this tutorial, we will create an image inpaint service using Stable Diffusion. We will deploy the endpoint to Koyeb as a web service, enabling users to upload images and receive modified versions based on their prompts.
You can consult the repository for this guide to follow along on your own. You can deploy Stable Diffusion by clicking the Deploy to Koyeb button below:

By the end, you will have built and deployed your own image inpainting service that will look like this:
Requirements
Here are the following requirements for the project:
- Python 3.10 or later
- Pytorch 2.4
- A Koyeb account
Steps
Here are the steps we will follow to build the image inpainting service:
- Set up the environment: Begin by setting up your project directory and installing the necessary dependencies, including Python and Hugging Face's Diffusers library. Configure the environment variables required for the application.
- Implement Inpaint: Use a pre-trained model, like Stable Diffusion, to handle the inpainting process. This function will take the user’s image and mask to generate the output.
- Set up the Web Service: Use Gradio to create the user interface for the inpainting service. The web interface will allow users to upload images and masks for the inpainting process.
- Dockerize the Application: Create a Dockerfile to containerize the application. This step ensures the service is portable and can be deployed consistently across environments.
- Deploy to Koyeb GPU: Deploy your Dockerized inpainting service on Koyeb. This final step brings your service online and makes it accessible to users.
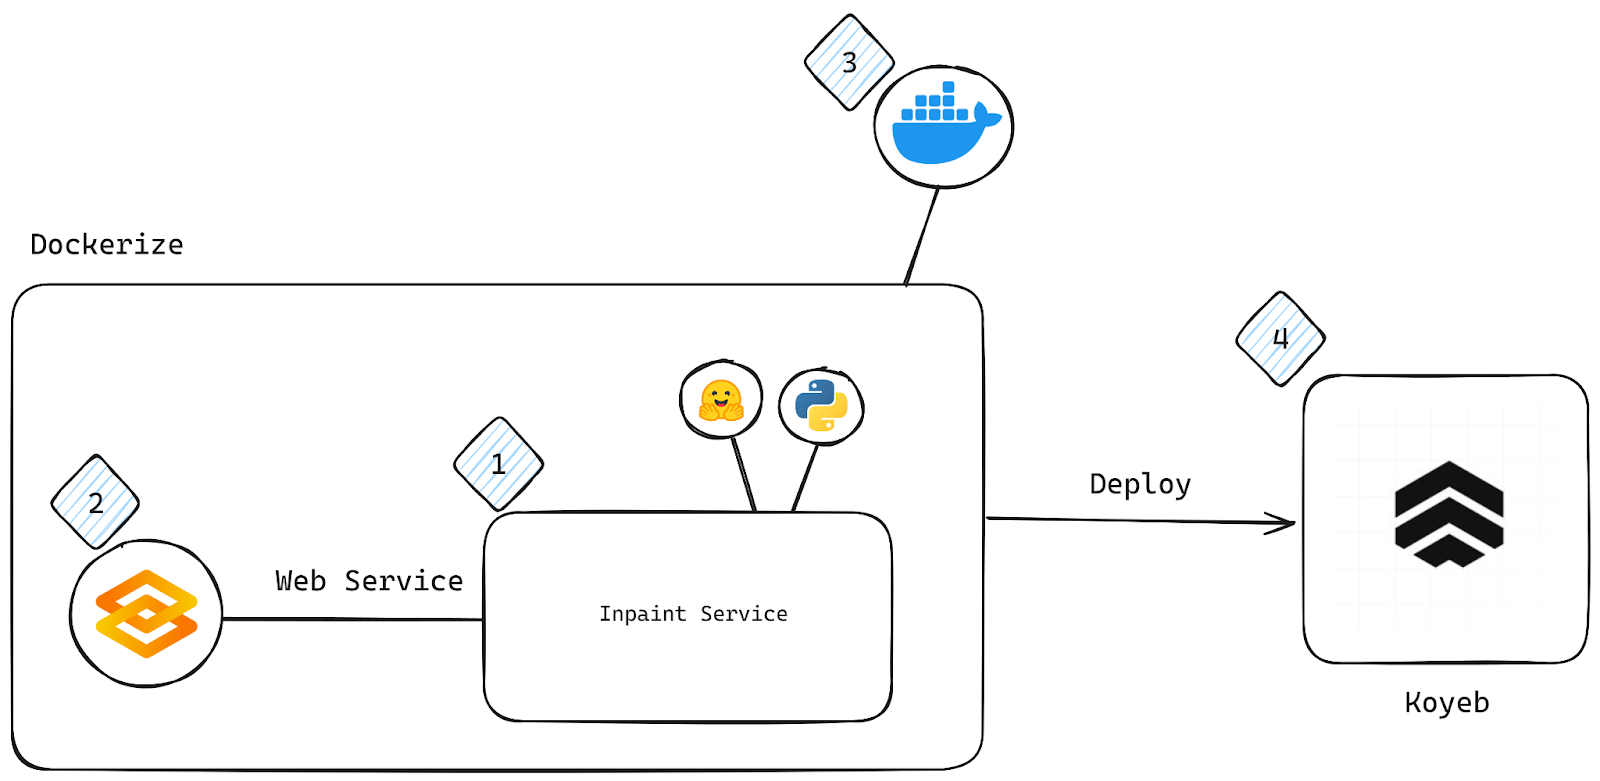
Overview of implementation of image inpaint service
In this section, we’ll guide you through implementing the image inpainting service and deploying it to Koyeb. Here is an overview of the approach to this project and a diagram of the application’s architecture:
Set up the project
First, let's create a project directory named inpaint-koyeb. This will be the base folder where all the code, models, and configurations for the image inpainting service will reside.
mkdir inpaint-koyeb
cd inpaint-koyeb
Create and activate a virtual environment
It's best to use a virtual environment to isolate the project dependencies and avoid conflicts with other projects. In this case, we’ll use Python 3.10
Ensure Python >=3.10 is installed. You can check your Python version by running:
python --version
Now, create and activate the virtual environment:
python -m venv env
Next, activate the virtual environment. On macOS/Linux:
source venv/bin/activate
On Windows:
.\venv\Scripts\activate
Once activated, your terminal will be prefixed with (venv), indicating the active environment.
Initialize Git repository
To track changes and manage your code efficiently, it’s a good idea to initialize your project directory as a Git repository. Run the following command:
git init
This will create a hidden .git folder in your project directory, allowing you to commit changes and work with version control.
Install requirements
Create requirements.txt. The requirements.txt file lists the dependencies your project will need. Create the file and add the following dependencies to it:
torch==2.4
diffusers==0.30.2
gradio==4.43.0
transformers==4.44.2
gradio_client==1.3.0
As we will build a Docker container later, we must add the versions to ensure consistency across environments and prevent breaking changes.
Finally, install the dependencies listed in requirements.txt using the following command:
pip install -r requirements.txt
This will ensure all necessary libraries for the inpainting service are installed within your virtual environment.
Create a .gitignore file
You should exclude specific files and directories, such as your virtual environment, from version control. Create a .gitignore file and add the venv folder to it to ensure Git does not track it:
# .gitignore
venv/
This will prevent your virtual environment from being uploaded to the repository.
Implement inpaint service
Huggingface has made it much easier for developers to work with the Stable Diffusion model by creating diffusers library. It allows you to quickly implement models for tasks like image generation, inpainting, and more, leveraging state-of-the-art architectures like Stable Diffusion.
In this example, we use the AutoPipelineForInpainting class from the diffusers library to create an inpainting model.
Import the necessary libraries
In an app.py file, import the necessary libraries:
import torch
from diffusers import AutoPipelineForInpainting
torch: This is the PyTorch library for tensors and GPU computations.AutoPipelineForInpainting: A pipeline specifically designed for the task of image inpainting.
Load the pre-trained inpainting model
Next, load the pre-trained inpainting model in the app.py file:
pipeline = AutoPipelineForInpainting.from_pretrained(
    "stabilityai/stable-diffusion-xl-base-1.0", torch_dtype=torch.float16
).to("cuda")

pipeline.enable_model_cpu_offload()
- Model: The model being used is
stable-diffusion-xl-base-1.0, which supports inpainting. This pre-trained model means you don’t need to train it from scratch. - Inference Speed: To optimize performance, we implemented the following:
- torch_dtype=torch.float16 ensures the model uses half-precision (FP16) for computations, which speeds up inference on modern GPUs.
- to("cuda") moves the model to the GPU for faster processing. This is important for large models like stable-diffusion-xl.
- Memory: To save memory, enable_model_cpu_offload() ensures the model offloads some parts of its computation to the CPU when GPU memory is full, allowing you to use larger models even on limited GPU resources.
Defining the inpainting function
Now that the model is ready, we define the function in app.py that will handle the inpainting process:
def image_inpaint(image_input, mask_input, prompt_input):
    image = pipeline(prompt=prompt_input, image=image_input, mask_image=mask_input).images[0]
    return image
The function image_inpaint is designed to take three inputs: the original image, a mask indicating the area to be filled in, and a text prompt that guides the model on how to fill in that masked region.
Inside the function, the pipeline object is used to perform the inpainting. It processes the image and mask according to the provided prompt, and then generates an output image where the masked part is filled in based on the prompt's instructions. Once the new image is created, the function returns it.
With this setup, we now have the core logic for modifying images by filling in missing parts. The next steps will cover how to create a user interface to make this functionality accessible to end users.
Set up the web service
To set up the web service, we will use Gradio. Gradio is an easy-to-use library that allows developers to create web interfaces for machine learning models and other Python functions. We will create a function that includes two image input sections, one text input section, and an output image section.
In your `app.py' file, add the following code to set up the Gradio interface:
import gradio as gr

def image_inpaint(image_input, mask_input, prompt_input):
    image = pipeline(prompt=prompt_input, image=image_input, mask_image=mask_input).images[0]
    return image

def gradio_interface():
    with gr.Blocks() as demo:
        gr.Markdown("## Image Inpainting Service")

        with gr.Row():
            with gr.Column():
                image_input = gr.Image(type="pil", label="Upload Image")
                mask_input = gr.Image(type="pil", label="Upload Mask")
                prompt_input = gr.Textbox(label="Enter Prompt", placeholder="Describe what you want to inpaint")
                submit_btn = gr.Button("Inpaint")

            with gr.Column():
                result_output = gr.Image(type="pil", label="Inpainted Image")

        # Connect the button click event with the image inpainting
        submit_btn.click(image_inpaint, inputs=[image_input, mask_input, prompt_input], outputs=result_output)

    demo.launch()

# Run the Gradio interface
if __name__ == "__main__":
    gradio_interface()
Here’s an explanation of the code above:
-
Import Gradio: We begin by importing the gradio library to set up the interface for the image inpainting service.
-
Creating the Interface Function (gradio_interface): The function gradio_interface() is where we define the layout and logic of the web service.
-
Gradio Blocks: gr.Blocks() define the overall structure of the interface. Think of it as the container for the entire UI.
-
Markdown Header: gr.Markdown() adds a header describing the service: "Image Inpainting Service."
-
Creating Input Fields:
- Image Input: gr.Image(type="pil", label="Upload Image") allows users to upload a base image for inpainting.
- Mask Input: gr.Image(type="pil", label="Upload Mask") lets users upload a mask, which defines the areas to be inpainted.
- Prompt Input: gr.Textbox() enables users to input a description of the changes or details to be inpainted into the image.
-
Submit Button: gr.Button("Inpaint") adds a button to trigger the inpainting process when clicked.
-
Output Image: gr.Image(type="pil", label="Inpainted Image") is where the result of the inpainting operation will be displayed.
-
Button Click Action: submit_btn.click() connects the button to the image_inpaint function, taking the inputs (image, mask, and prompt) and displaying the resulting inpainted image in the output.
-
Launch the Interface: demo.launch() starts the Gradio interface, making the web service accessible.
To run the application locally, simply execute the file:
python app.py
Dockerize the application
Dockerization is an essential step for packaging and deploying modern applications. Creating a Docker container ensures your application runs consistently in any environment. Deploying the application to Koyeb during the build step further streamlines this process. Now, let’s go through the Dockerfile, which will allow you to containerize your Image Inpainting Service.
FROM python:3.10
WORKDIR /app

# Copy the requirements file
COPY requirements.txt app.py

# Install the dependencies
RUN pip install --upgrade pip && pip install -r requirements.txt
ENV GRADIO_SERVER_NAME="0.0.0.0”
ENV GRADIO_SERVER_PORT=${GRADIO_SERVER_PORT:-8000}
CMD ["python", "app.py"]
Apart from the usual dockerfile commands, these are some new additions:
- CMD ["python", "app.py"]: This command tells Docker to execute the
app.pyfile (which starts the Gradio interface) when the container is run. The CMD instruction sets the container's default command.
Deploy to Koyeb GPU
With the application now running locally, you can quickly deploy it to Koyeb and make it accessible online.
Push the code to GitHub
Since we have already set up a GitHub repository, simply commit your changes and push the code to GitHub.
To do this, run the following commands in your terminal:
git add app.py Dockerfile requirements.txt .gitignore
git commit -m "first commit"
git branch -M main
git remote add origin [Your GitHub repository URL]
git push -u origin main`
Deploy the application on Koyeb
- In the Koyeb control panel, go to the Overview tab. Click Create Service and select Create Web Service to begin the app creation and deployment
- Choose GitHub as the deployment source
- From the menu, select your repository
- Under Instance Selection, choose a GPU Instance
- In the Builder section, select Dockerfile
- Adjust the grace period for TCP health checks to 300 seconds
- Click the Deploy button to finalize the process
After deploying the application, you can track the deployment progress through the provided build and runtime logs. Once the deployment is complete and health checks pass, your Gradio application will be up and running.
Click the provided public URL to access your live application.
Here is an example of the deployed application:
Conclusion
In this guide, you built an image inpainting service using Stable Diffusion and Gradio and deployed it on Koyeb. You learned how to set up a Python environment, implement the inpainting function with Stable Diffusion, and create a user-friendly web interface with Gradio. After containerizing the application with Docker, Koyeb enabled scalable and efficient deployment.
The models for image inpaint are computationally expensive, so we want something like Koyeb to handle the deployment and scaling.
With automatic builds and deployments managed through Git, Koyeb ensures your service remains operational, even in the event of a failed deployment, by reverting to the last stable version.

