Using ComfyUI, ComfyUI Manager, and Flux to Generate High-Quality Images on Koyeb
Recently, AI image creation has seen significant progress. Many new tools are available to make the creative process easier with flexible, powerful functionality. One of these tools, ComfyUI, has grown to prominence due to its versatile, ease of use, and high-quality image generation.
Whether you're an artist wanting to try new things or a developer wanting to use AI for visual content, ComfyUI is a powerful tool that can help solve your image-based needs. In this guide, we'll explain what ComfyUI is, how it works, and how to set it up on a Koyeb GPU.
We'll also show you how to install ComfyUI Manager to add custom modules and give a step-by-step process for making high-quality images with Flux. By the end of this guide, you'll know everything you need to get the most out of ComfyUI and create amazing visuals.
You can consult the project repository as work through this guide. You can deploy ComfyUI as configured in this tutorial using the Deploy to Koyeb button below:

What is ComfyUI?
ComfyUI is a powerful, easy-to-use tool for creating images with AI. Users can design workflows, adjust settings, and see results immediately.
Key features
- User-friendly interface: ComfyUI is designed to be simple so users of all skill levels can easily navigate and use its features.
- Modular workflow design: Users can create custom workflows by connecting different components, enabling flexibility in the image creation process.
- Real-time feedback: ComfyUI provides instant visual feedback so users can see the effects of their adjustments and fine-tune their workflows as needed.
- Integration with AI models: ComfyUI supports a variety of pre-trained AI models, as well as custom models, allowing users to generate images that meet their specific needs.
Use cases
ComfyUI is great for many different uses, such as:
- Artistic creation: Artists can use ComfyUI to explore new creative ideas, make unique visuals, and try out different styles and techniques.
- Graphic design: Graphic designers can use ComfyUI to quickly create design elements, make mockups, and streamline their work process.
- Content creation: Marketers, bloggers, and content creators can use ComfyUI to make eye-catching visuals for their content, making it more engaging and appealing.
- Research and development: AI researchers and developers can use ComfyUI to test and visualize the performance of different models, experiment with new algorithms, and push the limits of AI-driven image generation.
Basics of a ComfyUI workflow
At its core, a ComfyUI workflow is a series of connected modules, each doing a specific job in the image creation process. You can arrange these modules in different ways to get different results, giving you the flexibility to customize your workflows to fit your needs.
Key components of the workflow
Let's see the example of the default ComfyUI workflow to understand better the components:
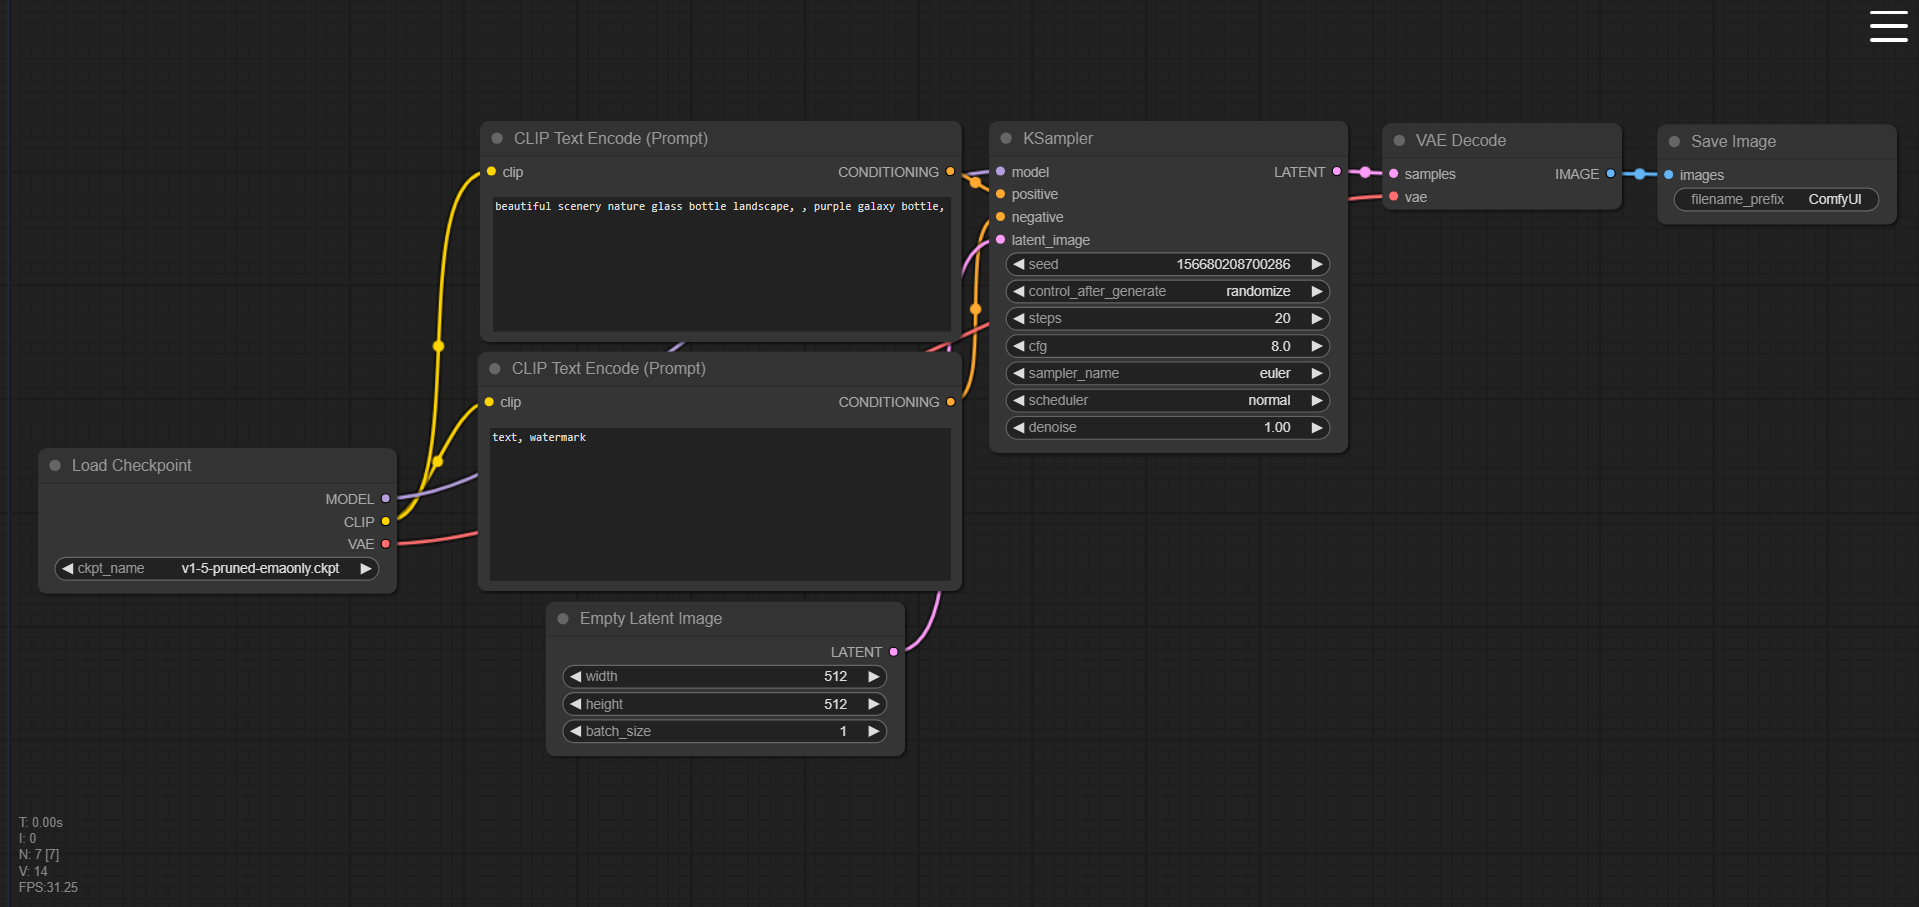
The components of the workflow can be grouped in the following categories:
- Input modules: This is the starting point of any workflow. The input module lets you set the initial settings like image size, model choice, and input data (such as sketches, text prompts, or existing images). In the example above, for instance, the
Load CheckpointandCLIP Text Encodecomponents are input modules. - Processing modules: These parts handle various aspects of the image creation process, like applying filters, adjusting colors, refining details, and more. You can stack or arrange processing modules in parallel to create complex effects. In the example above, the
KSamplercomponent is a processing module. - Output module: These are the final stages of the workflow, where the generated image is created and saved. You can specify the output format, resolution, and other details. In the example above, the
Save Imagecomponent is an output module. - Control modules: These parts give you additional control over the workflow, allowing you to tweak settings, adjust weights, and fine-tune the process. Control modules are essential for getting the desired results and ensuring high-quality outputs. In the example above, the
Empty Latent Imagecomponent is a control module.
Install ComfyUI on Koyeb GPUs
If you want to use the power of cloud computing for your image generation tasks, installing ComfyUI on a Koyeb GPU is a great choice. Koyeb offers powerful GPU instances that can handle the demanding requirements of AI-driven image generation, making sure your processing is fast and efficient.
Prerequisites
Before starting the installation process, make sure you have the following:
- A Koyeb account: Sign up for a Koyeb account if you don't already have one.
Create a Dockerfile
We'll start by preparing a Dockerfile so we can make sure we have all of the dependencies installed, especially for GPU support. Create a Dockerfile with the following contents:
# Use the official Python base image
FROM python:3.12

# Clone the repository
RUN git clone https://github.com/comfyanonymous/ComfyUI.git

# Set the working directory
WORKDIR /ComfyUI

# Update pip, install GPU dependencies, and install Comfy dependencies
RUN pip install --upgrade pip && pip install torch torchvision torchaudio --extra-index-url https://download.pytorch.org/whl/cu121 && pip install -r requirements.txt

# Set the entry point for the container
CMD python3 main.py --listen 0.0.0.0 --port ${PORT:-8188}
This Dockerfile sets up a container image for running ComfyUI. Here's what it does step-by-step:
- First, it starts with a base Python image, specifically version 3.12.
- Next, it downloads the ComfyUI repository from GitHub. This repository contains all the code and resources needed to run ComfyUI.
- It sets the working directory to where ComfyUI was downloaded, so any subsequent commands are executed in the correct location.
- Next, it updates the
pippackage manager to the latest version to ensure compatibility with new packages. Chained to thisRUNinstruction are additionalpipcommands that install the GPU dependencies including PyTorch, and a command that installs ComfyUI's dependencies from the includedrequirements.txtfile. - Finally, it sets the default command to run the ComfyUI application when the container starts. This command uses
0.0.0.0as the IP address, which means the application will be accessible from any network interface. It listens on the port defined by thePORTenvironment variable, using ComfyUI's default port 8188 as a fallback if the environment variable is unset.
Create the repository
The final step is to create a new repository on GitHub to store the project files.
Once you're ready, run the following commands in your terminal to commit and push your code to the repository:
echo "# ComfyUI-Flux" >> README.md
git init
git add .
git commit -m "First Commit"
git branch -M main
git remote add origin [Your GitHub repository URL]
git push -u origin main
You should now have all your local code in your remote repository. Now it is time to deploy the Dockerfile.
Deploy to Koyeb
In the Koyeb control panel, while on the Overview tab, initiate the app creation and deployment process by clicking Create App.
On the App deployment page:
- Select GitHub as your deployment method.
- Choose the repository where your code resides. For example,
ComfyUI-Flux. - Select the GPU you wish to use, for example,
RTX-4000-SFF-ADA. - In the Builder section, choose Dockerfile.
- In the Service name section, choose an appropriate name.
- Finally, click Deploy.
After a few minutes, your application should be available at the indicated URL.
What is ComfyUI Manager?
While ComfyUI comes with a set of pre-built modules, its real power comes from its extensibility through custom modules.
ComfyUI Manager is a plugin that lets users manage and install custom modules directly within the ComfyUI interface. It provides an easy-to-use interface for browsing available modules, installing them with a single click, and integrating them into your workflows.
Install ComfyUI Manager
To install ComfyUI Manager, the simplest way is to modify your Dockerfile to include the necessary commands to install it.
Update your Dockerfile to add an additional git clone command as follows:
# Use the official Python base image
FROM python:3.12

# Clone the repository
RUN git clone https://github.com/comfyanonymous/ComfyUI.git

# Set the working directory
WORKDIR /ComfyUI

# Update pip, install GPU dependencies, and install Comfy dependencies
RUN pip install --upgrade pip && pip install torch torchvision torchaudio --extra-index-url https://download.pytorch.org/whl/cu121 && pip install -r requirements.txt

# Clone ComfyUI-Manager
RUN git clone https://github.com/ltdrdata/ComfyUI-Manager.git /ComfyUI/custom_nodes/ComfyUI-Manager

# Set the entry point for the container
CMD python3 main.py --listen 0.0.0.0 --port ${PORT:-8188}
This Dockerfile sets up a container for running ComfyUI and installs also ComfyUI Manager. The only difference from the previous Dockerfile is that it clones the ComfyUI manager repository into ComfyUI's custom_nodes directory.
Once you're done, commit the changes to your repository and push them to GitHub:
git add .
git commit -m "Add ComfyUI Manager"
git push origin main
Your Koyeb application will automatically create a new deployment based on your updated Dockerfile.
Using custom modules
With ComfyUI Manager installed, you can now easily integrate custom modules into your workflows.
Whether you're looking to add new processing techniques, experiment with different models, or create entirely new workflows, the possibilities are endless.
We will use ComfyUI Manager to install Flux in the next section to generate high-quality images.
Workflow for high-quality image generation with Flux
One of the great features of ComfyUI is that it can work with advanced AI models like Flux, which are specifically made for creating high-quality images. In this section, we'll guide you through a detailed process for generating amazing images using ComfyUI and Flux.
What is Flux?
Flux is a powerful AI model made for creating high-quality images. It's one of the latest deep learning models that use large datasets, complex structures, and advanced algorithms to generate images that look realistic and are artistically impressive.
Key features of Flux
- High-resolution outputs: Flux is designed to produce high-resolution images, making it perfect for tasks where detail and clarity are important, like digital art, graphic design, and print media.
- Artistic flexibility: One of Flux's standout features is its ability to adapt to different artistic styles. Whether you want photorealism, impressionism, or a more abstract look, Flux can be adjusted to create images that match your desired style.
- Deep learning architecture: Flux uses a deep neural network architecture, which includes multiple layers of convolutional, generative, and refinement processes. This complex architecture allows it to understand and replicate intricate patterns, textures, and lighting effects in images.
- Contextual understanding: Unlike some earlier models, Flux has a strong ability to understand the context within images. This means it can accurately maintain the coherence of a scene, ensuring that elements in the image are not only visually consistent but also logically related.
- Versatile input methods: Flux supports various input methods, including text prompts, sketches, and even other images. This versatility allows users to guide the image generation process more effectively, providing a high degree of creative control.
Applications of Flux
- Digital art: Artists use Flux to create detailed and stylistically diverse pieces of digital art. Its ability to interpret and generate different artistic styles makes it a valuable tool for creators looking to push the boundaries of digital expression.
- Graphic design: Graphic designers benefit from Flux's high-resolution outputs and its capability to generate assets that can be directly used in branding, marketing materials, and product designs.
- Content creation: For content creators, Flux offers a way to quickly generate unique visuals that can enhance blog posts, social media content, and other digital media.
- AI research: Researchers in the field of artificial intelligence use Flux to explore new techniques in image generation, test theories in deep learning, and develop new applications for AI in the creative industries.
Install Flux on ComfyUI with ComfyUI Manager
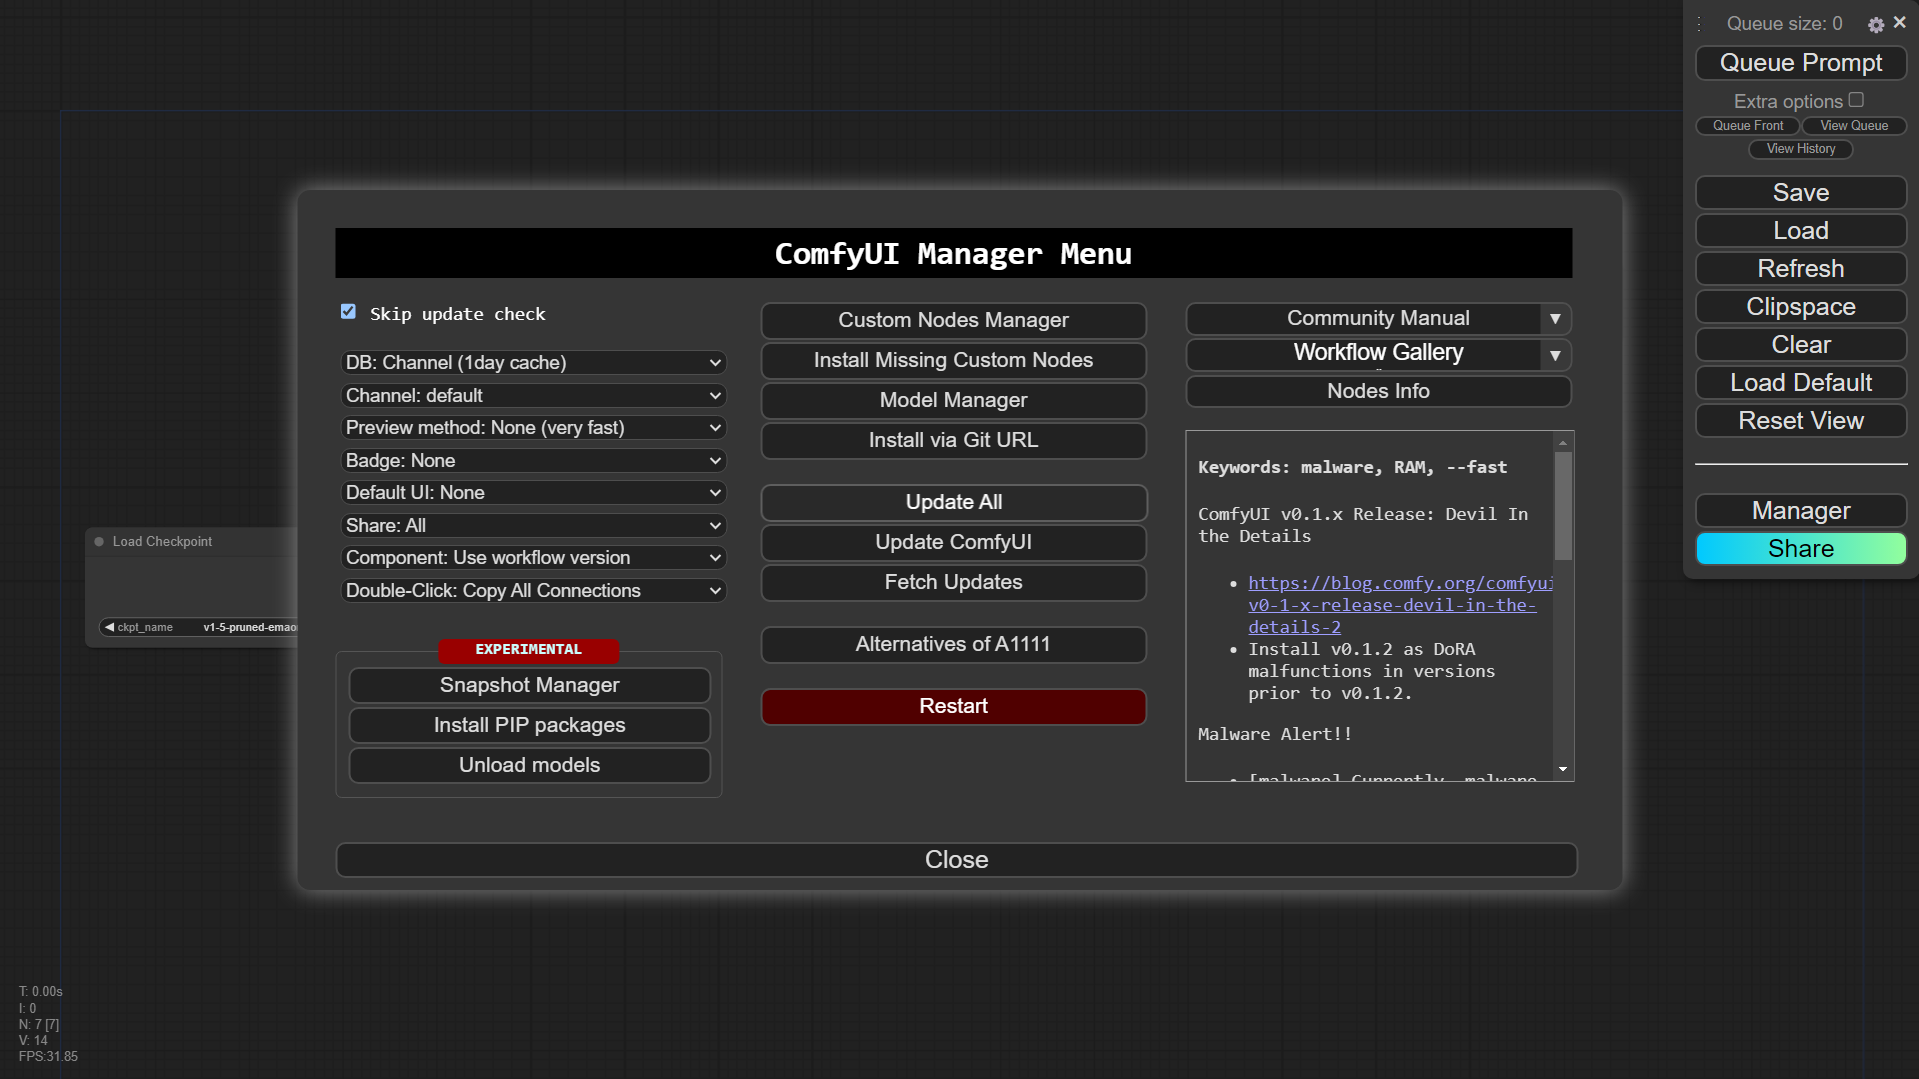
To install a Flux model/checkpoint on ComfyUI, you can use the ComfyUI Manager. Open the ComfyUI Manager by clicking Manager in the sidebar menu.
This will open the manager window:
From here, click on Model Manager and then search for "flux":
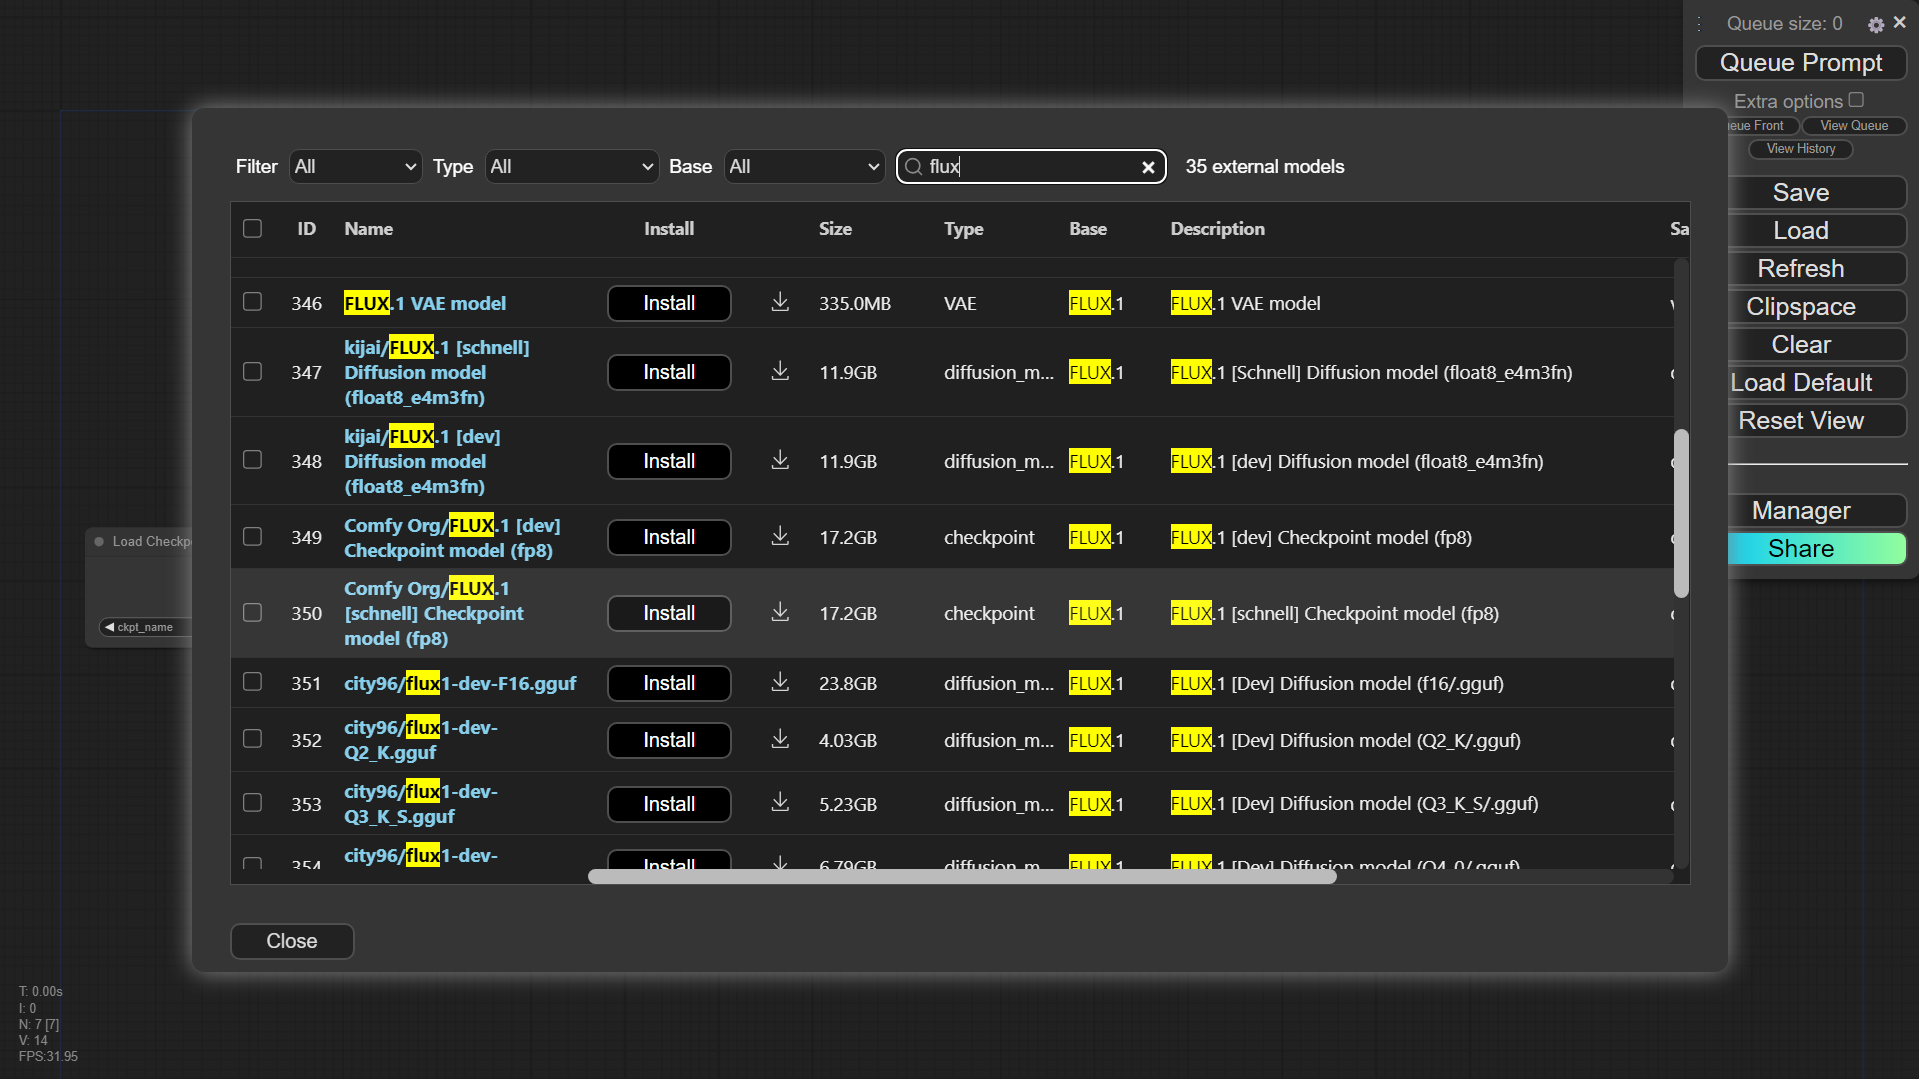
For this example, install the "Comfy Org/FLUX.1 [schnell]" checkpoint by click the install button.
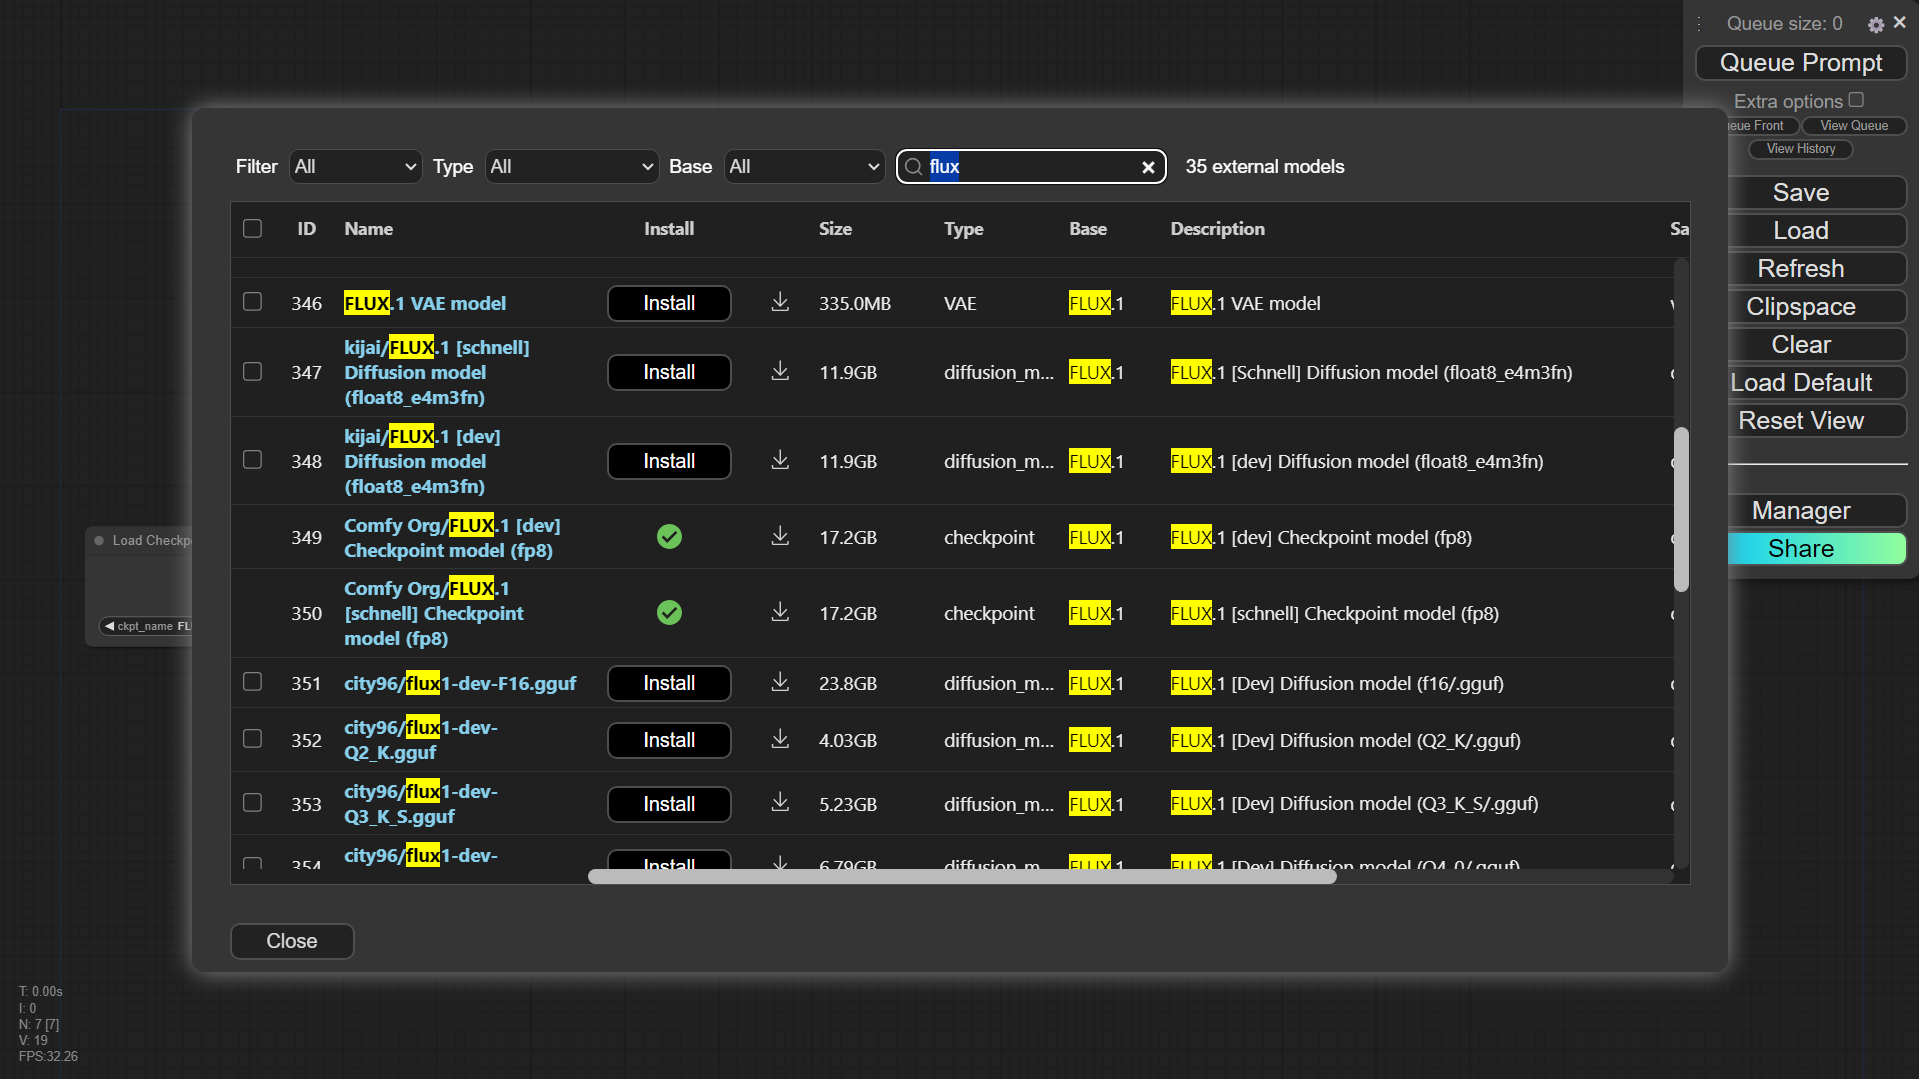
After a couple of minutes the download and install should complete:
Now you can build your workflow to generate a high-quality image. You can use our sample workflow as a starting point. Download the file to your local computer.
To load the workflow into ComfyUI, click the Load button in the sidebar menu and select the koyeb-workflow.json file you just downloaded. Next, select the Flux checkpoint in the Load Checkpoint node and type in your prompt in the CLIP Text Encode (Prompt) node.
When you are ready, press CTRL-Enter to run the workflow and generate the image:
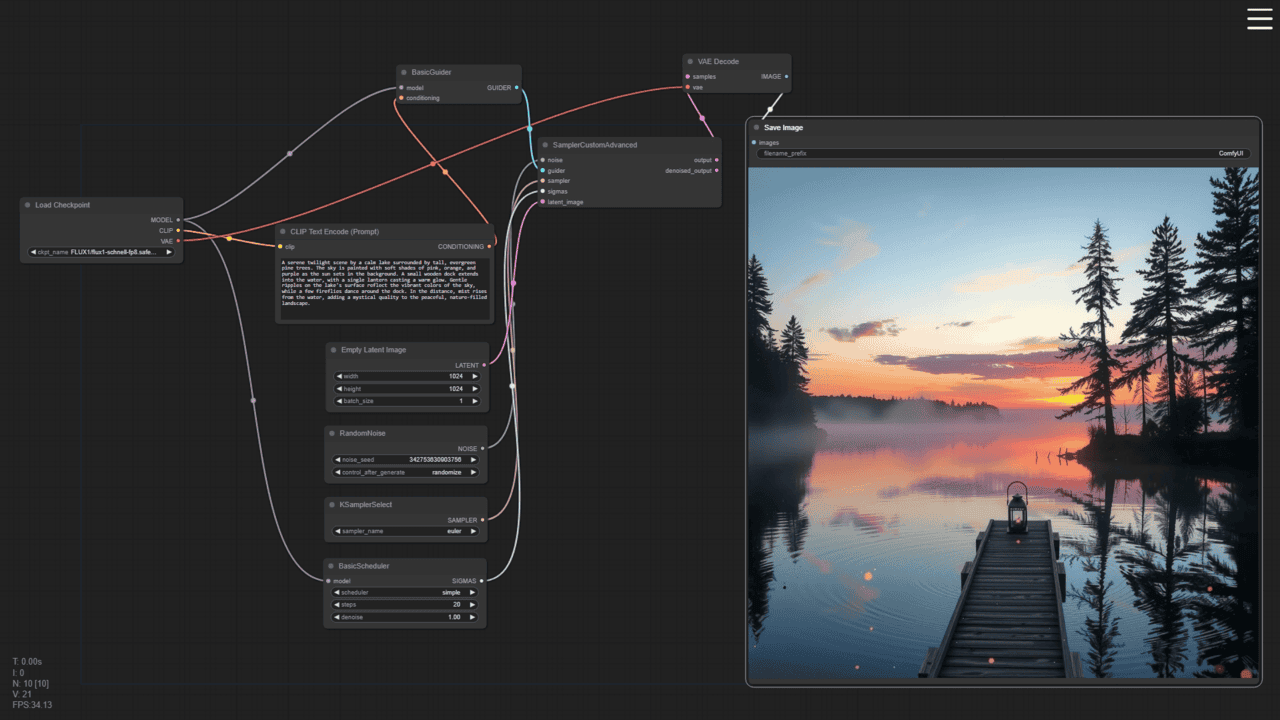
Here is the prompt included in the Koyeb sample workflow file followed by an example of an image generated from it:
A serene twilight scene by a calm lake surrounded by tall, evergreen pine trees. The sky is painted with soft shades of pink, orange, and purple as the sun sets in the background. A small wooden dock extends into the water, with a single lantern casting a warm glow. Gentle ripples on the lake's surface reflect the vibrant colors of the sky, while a few fireflies dance around the dock. In the distance, mist rises from the water, adding a mystical quality to the peaceful, nature-filled landscape.

Conclusion
ComfyUI is a powerful and flexible tool for making images with AI. It has a user-friendly interface, lets you design your own workflows, and can work with advanced models like Flux. Whether you are an artist, designer, or researcher, ComfyUI gives you the tools you need to create amazing visuals easily.
By following the steps in this guide, you learned how to set up ComfyUI on a Koyeb GPU, add custom modules with ComfyUI Manager, and create high-quality images using a detailed workflow. The possibilities are endless, and with ComfyUI, the only limit is your imagination.

